Prepare for the Service Mesh Workshop
Table of Contents
- Introduction
- Istio Ambient with Minikube
- Istio Classic with local Kubernetes system
- Docker Desktop
- Minikube
- Kind
- Setup Istio
- Pre-Pull Base Docker Images
- Log Streaming with Stern
- IDE, Maven and Gradle (Optional)
Introduction
Each exercise in the workshop is shown live by the tutor as an interactive demo with detailed explanations. This makes it possible for all participants to passively consume the demos and theory of the topics.
But hands on learning is also possible during the workshop. All participants will receive a handout with all the relevant files they need to carry out the demos themselves. As a prerequisite for running the demos, you need access to a Kubernetes cluster with Istio installed. One way to achieve this is to install a local Kubernetes cluster on your laptop.
Istio Ambient with Minikube
For Istio Ambient based workshops is necessary to install Minikube (and not Docker Desktop). Istio Ambient uses a CNI Plugin to configure the network inside Kubernetes. Docker Desktop has so far no support for CNI Plugins.
The documentation for installing Minikube on your laptop can be found here:
https://minikube.sigs.k8s.io/docs/start/
Please use the preferred drivers to run your Minikube cluster:
https://minikube.sigs.k8s.io/docs/drivers/
After Installing Minikube you can create and start your new Kubernetes cluster with the following command:
minikube start --cpus 4 --memory 8192
This will create a new Minikube Kubernetes cluster with 4 CPUs and 8 GB Memory. If your underlying Docker runtime has limited CPU or memory then you will get an error creating a Minikube cluster. If this is the case, you must first reconfigure the resource limits for your Docker runtime. After this you should be able to create a Minikube cluster with the setting before. A minimum recommendation for the Istio workshops are: 2 CPUs and 4 GB Memory, but more (like before) is better.
After a successful start of Minikube you can stop the running container with:
minikube stop
For the workshop we also need the binary files for Istio. Please download Istio with the following command:
curl -L https://istio.io/downloadIstio | ISTIO_VERSION=1.24.0 sh -
This curl command will download Istio and extract it into a subfolder below the folder you issued the curl command.
Istio Classic with local Kubernetes system
Workshops for classic Istio (no Istio Ambient) can be operated on the following three alternatives:
- Docker Desktop (with activated Kubernetes)
- Minikube (with Docker Desktop or Podman)
- Kind (with Docker Desktop or Podman)
For all alternatives described below you must have root rights on your laptop!
Docker Desktop
The easiest and most comfortable way to use a local Kubernetes comes with Docker Desktop (just my personal opinion).
Docker Desktop Licence
Some of the companies switched from Docker Desktop because of the new licence strategy. But for this workshop, Docker Desktop is for free.
Extract from the FAQs (https://www.docker.com/pricing/faq/):
Docker Desktop may be used for free as part of a Docker Personal subscription for:
- Small companies (less than 250 employees AND less than $10 million in annual revenue)
- Personal use
- Education and learning (as a student or instructor, either in an academic or professional environment)
- Non-commercial open source projects
Examples of freely permitted usage include:
- Personal projects with less than $10 million revenue per year
- Students and teachers (whether in an educational or professional setting)
- Research at not-for-profit institutions
- Personal contributions to non-commercial open source projects
Download and Install
Follow the link to start Docker Desktop installation:
https://www.docker.com/products/docker-desktop
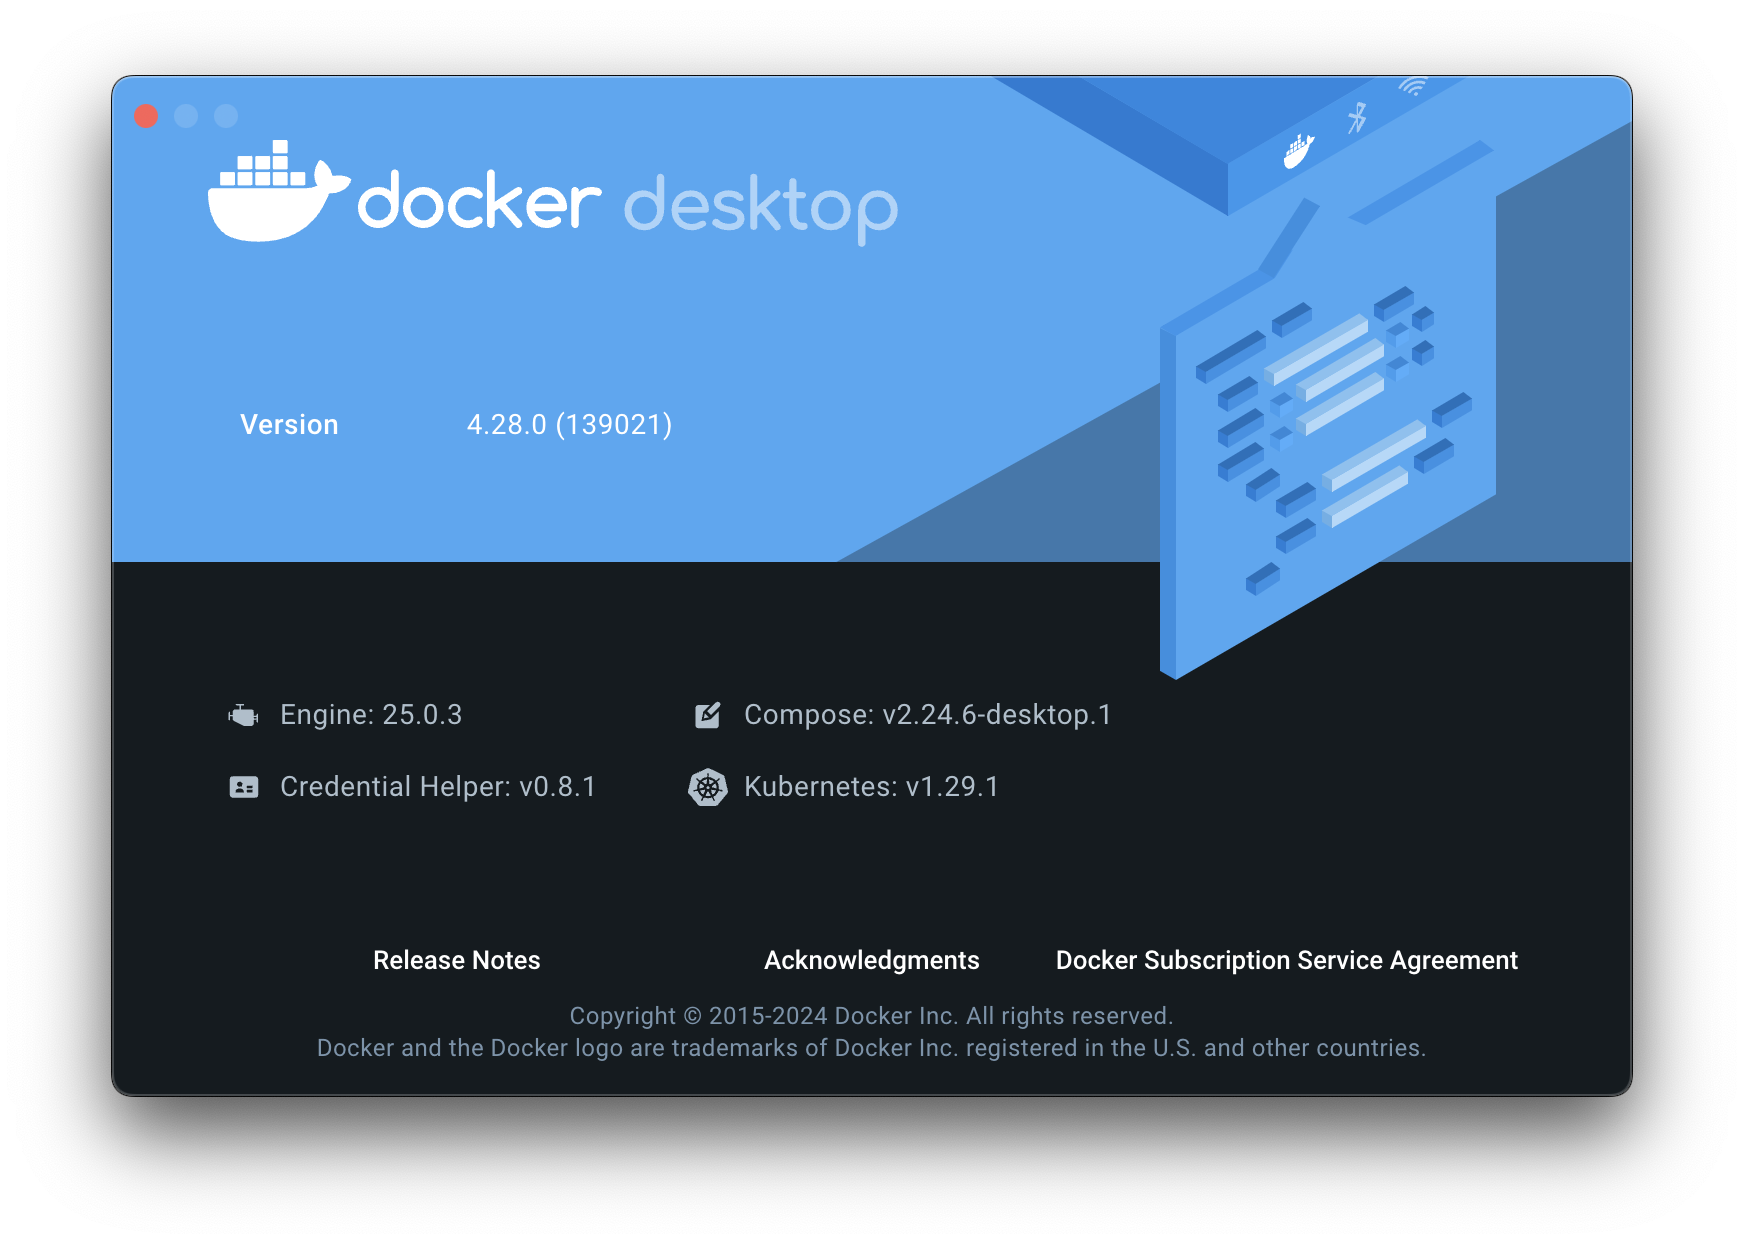
Verify Installation
After installation and starting Docker Desktop you can verify a succesful installation by clicking on About Docker Desktop in the context menu. The following dialog will appear:
An alternative way to verify the installation is to use the following shell command:
docker version
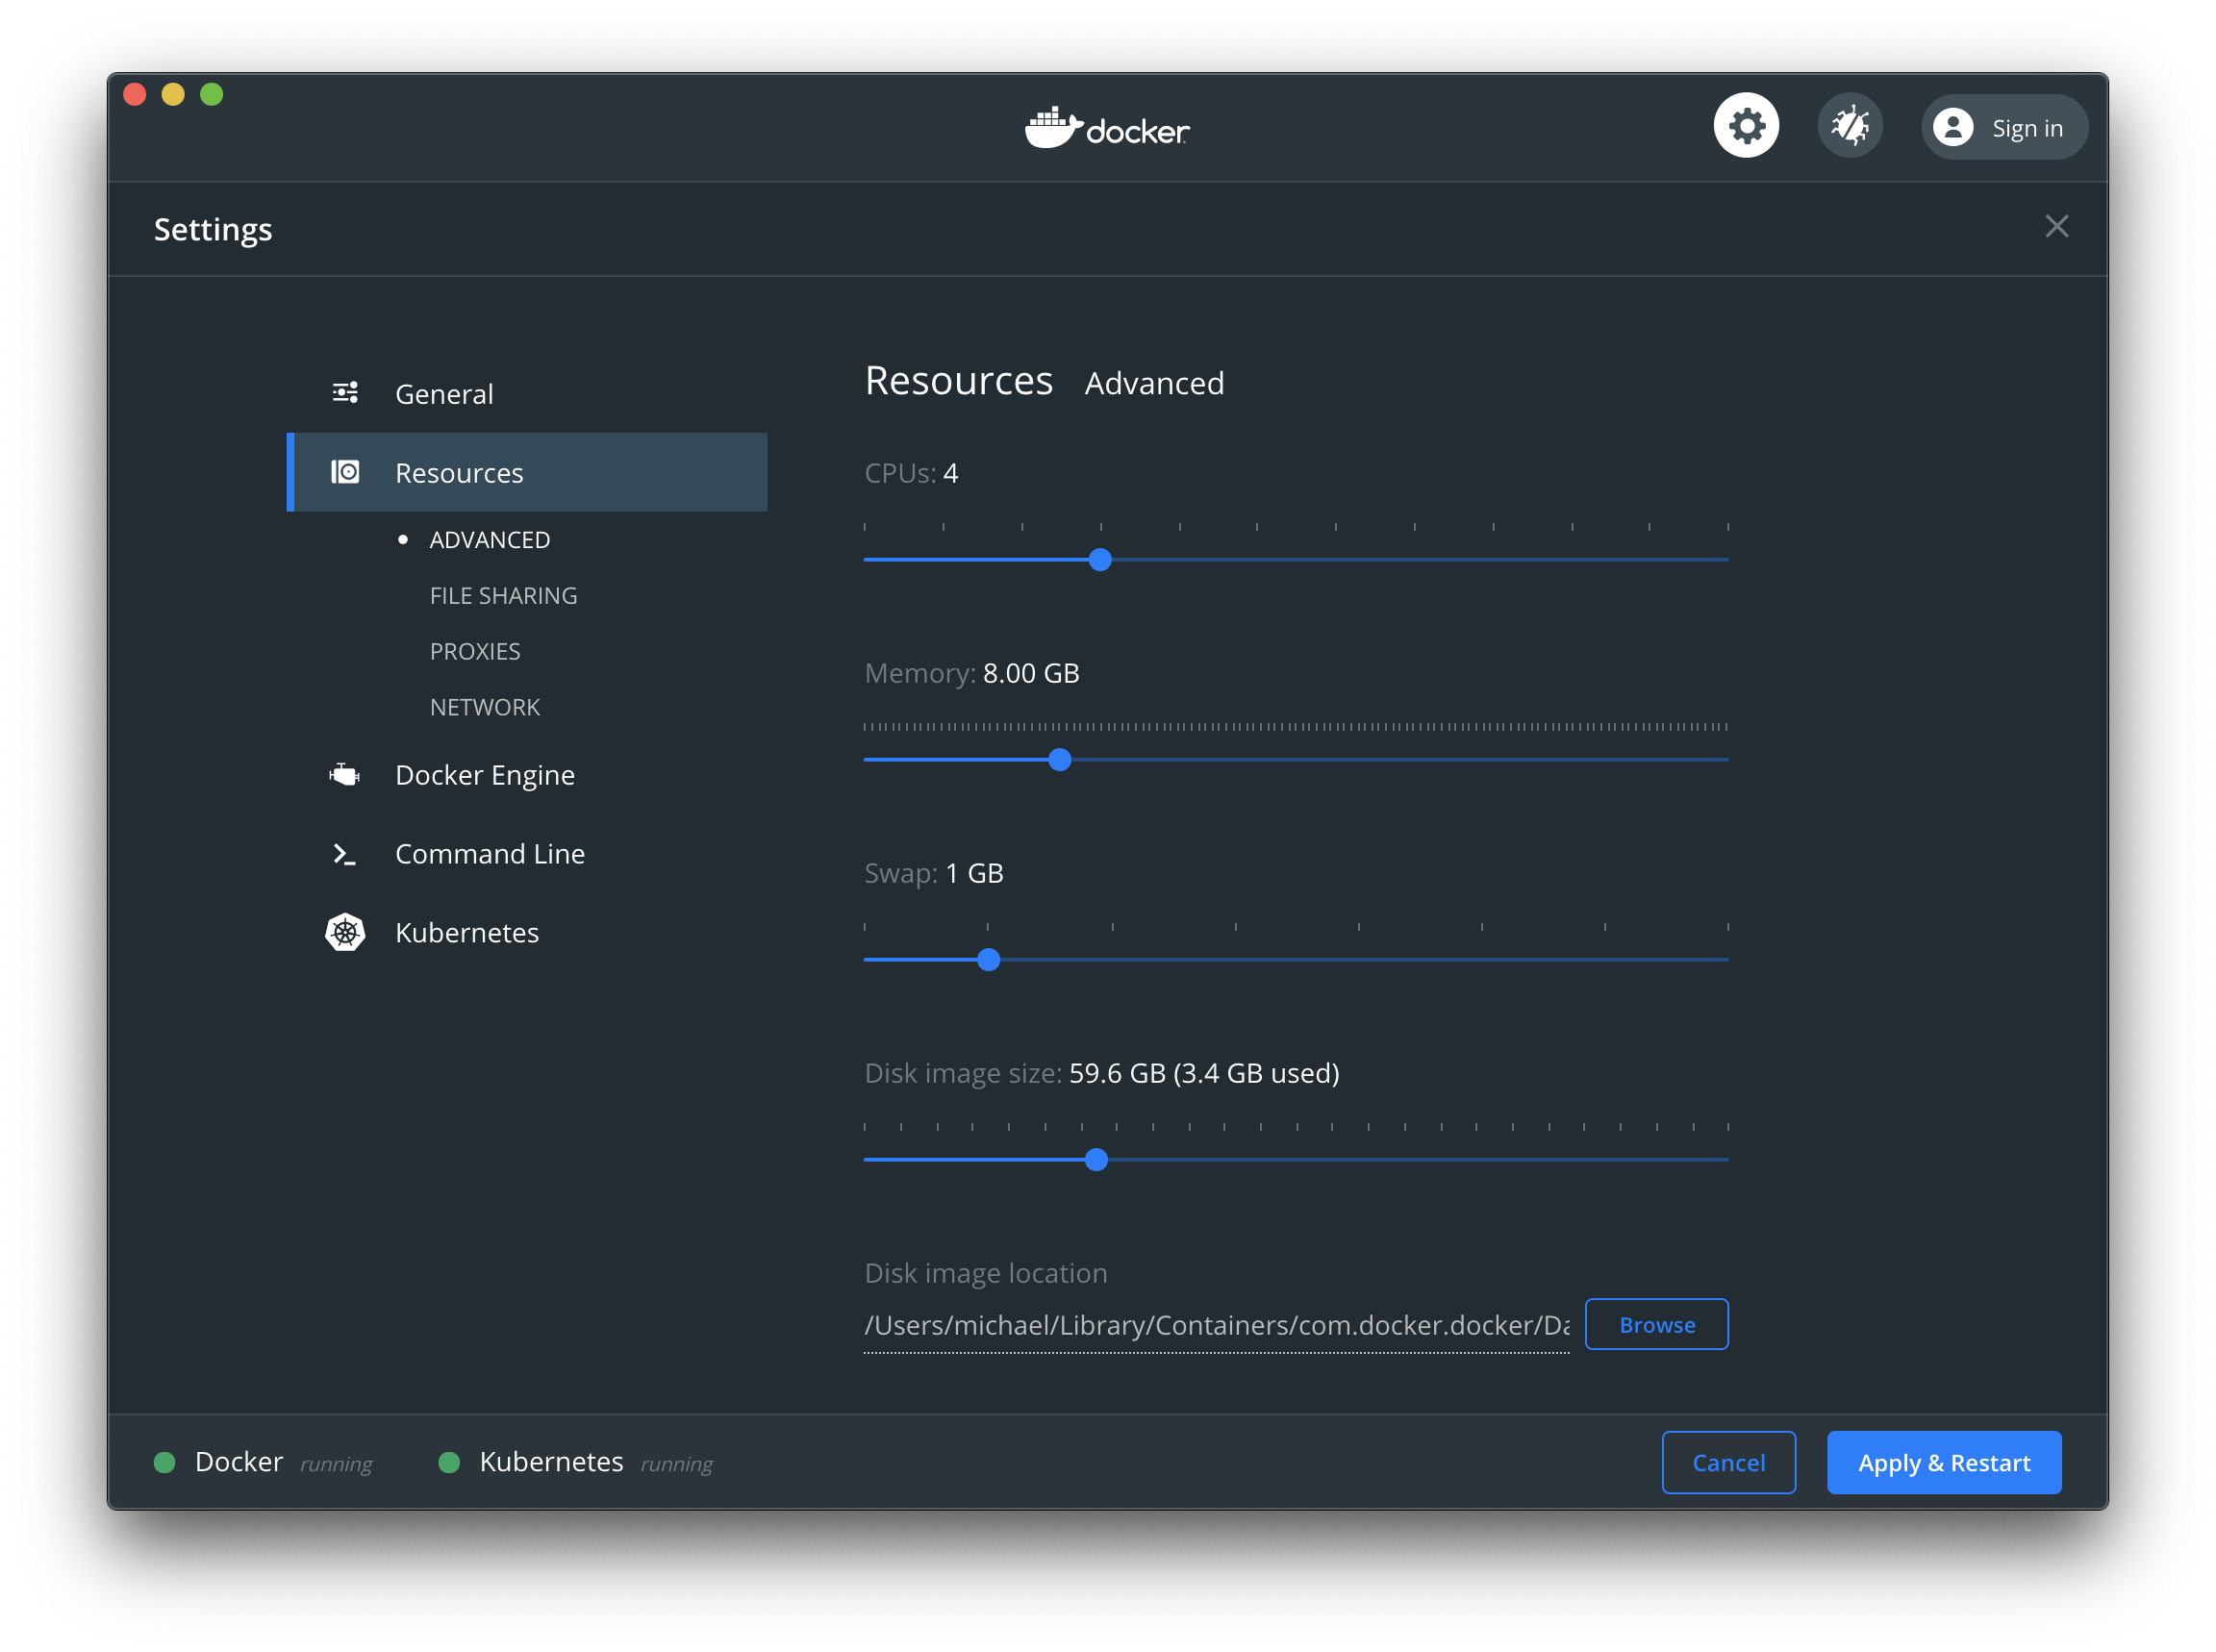
Change Settings in Docker Desktop
Recommended settings to run Istio in Docker Desktop:
https://istio.io/docs/setup/platform-setup/docker/
The recommended settings are 4 CPUs and 8 GB RAM, as shown on this screenshot:
Activate Kubernetes
Right click on Docker Desktop and open the Preferences (or Settings) dialog. A click on Kubernetes menu opens the following dialog:
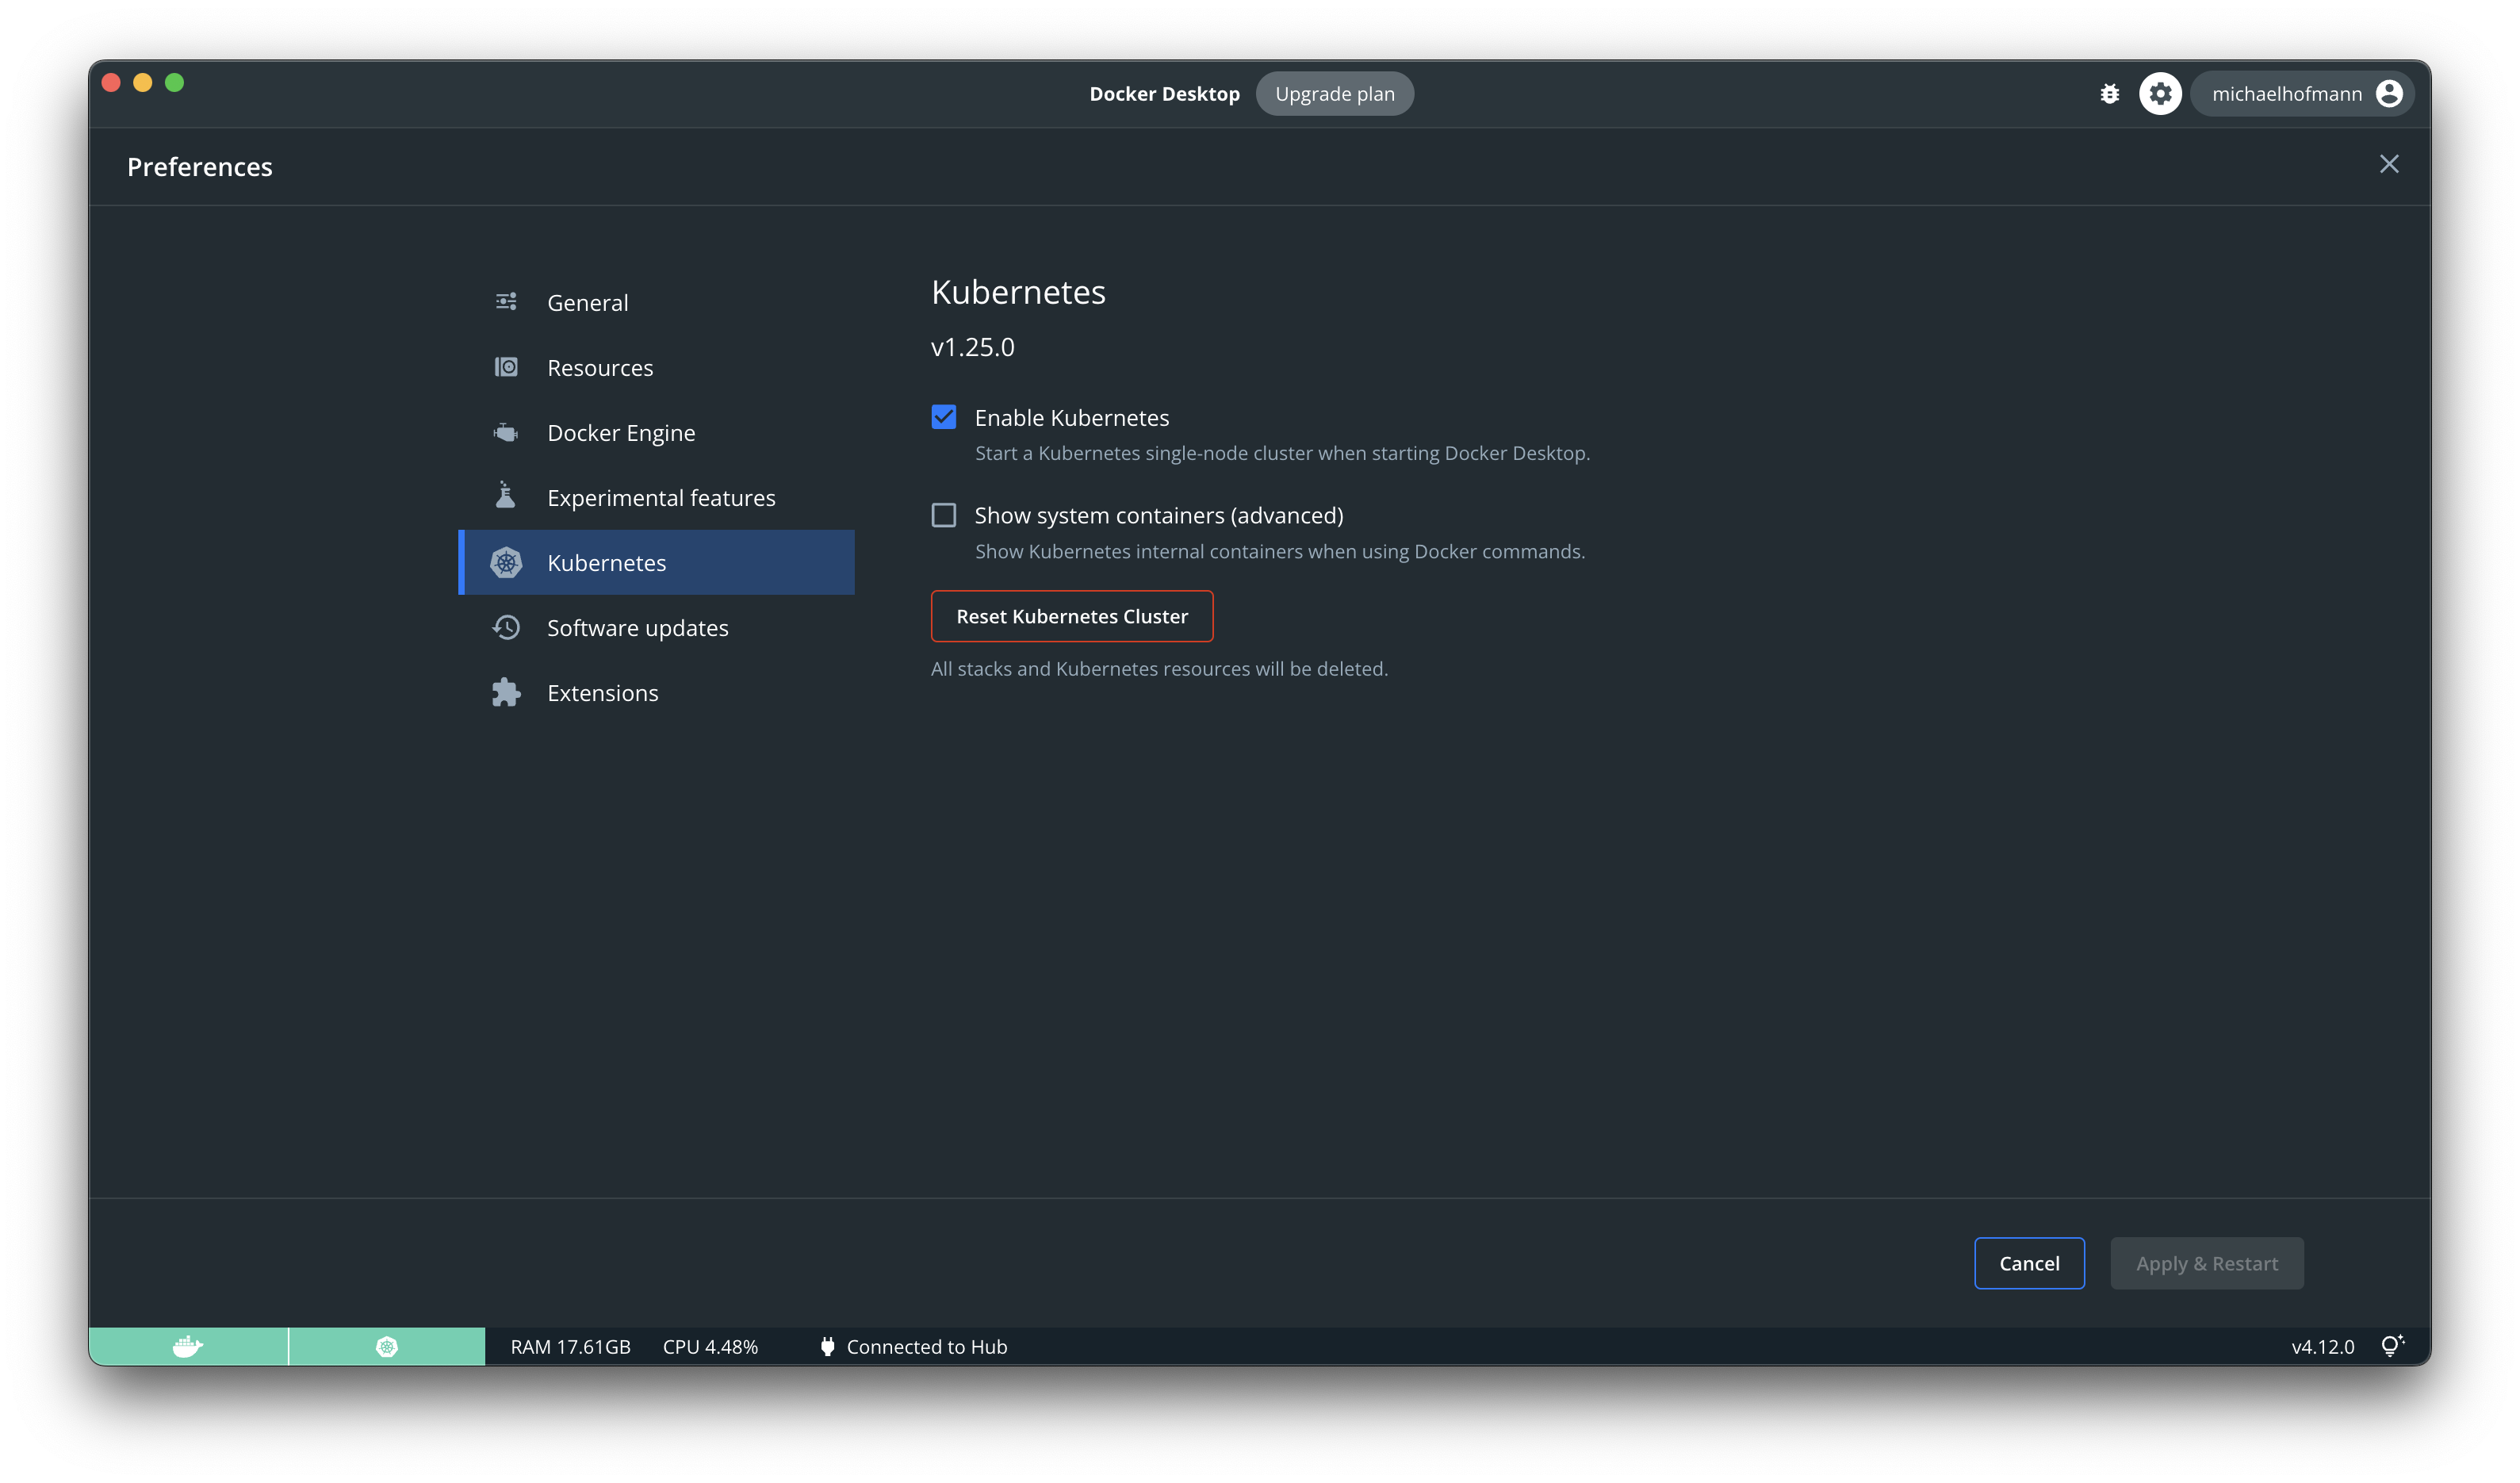
Check Enable Kubernetes and Apply & Restart to activate Kubernetes. Depending on the internet speed, this step can take some time (only for the first time of execution). A download for all necessary Kubernetes containers gets started in the background. A succesful installed and started Kubernetes will be shown in the status area.
You can see the downloaded containers by clicking on Show system containers (advanced) :
➜  docker images | grep k8s
...
Docker Desktop also installs kubectl. To verify this part of the installation you can check kubectl with the following shell command:
➜ kubectl version
Minikube
Minikube is supported for Linux, Windows and macOS. For every OS you can choose between different drivers. The recommendations for memory (8 GB) and CPU (4 CPUs) for this workshop must be applied to the choosen driver.
For installation instructions please refer to:
https://minikube.sigs.k8s.io/docs/drivers/
We need to expose Kubernetes services of type NodePort and LoadBalancer to the host machine. This article describes how to do this:
https://minikube.sigs.k8s.io/docs/handbook/accessing/
Section for NodePort:
https://minikube.sigs.k8s.io/docs/handbook/accessing/#nodeport-access
Section for LoadBalancer:
https://minikube.sigs.k8s.io/docs/handbook/accessing/#loadbalancer-access
Kind
Everybody who is already familiar with Kind can also use this system to run a local Kubernetes cluster.
A disadvantage of using Kind is the missing integration of an ingress controller. It must be installed separately.
A good alternative for installing an ingress controller is using kubefwd:
https://kubefwd.com
Kubefwd queries for all services in the Kubernetes cluster and establishes a port-forwarding connection to every Kubernetes service it finds.
Please remember to set the recommended memory (8GB) and CPUs (4 CPUs) in the underlaying driver of your Kind installation.
Setup Istio
We use Istio 1.27.0 in this workshop.
More background information can be found on this page:
https://istio.io/docs/setup/getting-started/
Download Istio
➜ curl -L https://istio.io/downloadIstio | ISTIO_VERSION=1.27.0 sh -

Downloading istio-1.27.0 from https://github.com/istio/istio/releases/download/1.27.0/istio-1.27.0-osx.tar.gz ...
Istio 1.27.0 Download Complete!

Istio has been successfully downloaded into the istio-1.27.0 folder on your system.

Next Steps:
See https://istio.io/latest/docs/setup/install/ to add Istio to your Kubernetes cluster.

To configure the istioctl client tool for your workstation,
add the /Users/michael/Work/tools/istio-1.27.0/bin directory to your environment path variable with:
	 export PATH="$PATH:/Users/michael/Work/tools/istio-1.27.0/bin"

Begin the Istio pre-installation check by running:
	 istioctl x precheck

Need more information? Visit https://istio.io/latest/docs/setup/install/
Extend your PATH variable by executing the export command from the previous output, e.g.::
export PATH="$PATH:/Users/michael/Work/tools/istio-1.27.0/bin"
Hint: the value of the download folder which will be set as PATH variable depends on the folder where you started the download.
Install Istio
Make sure your Kubernetes Context is set for Docker Desktop Kubernetes:
kubectl config current-context
docker-desktop
or set the current context:
kubectl config set current-context docker-desktop
Property "current-context" set.
Now it's time to install Istio into your new Kubernetes cluster. For demonstration purposes we use Istio's demo profile. Background information about the profiles can be found here:
https://istio.io/docs/setup/install/istioctl/#install-a-different-profile
Install Istio with demo profile:
istioctl install --set profile=demo
To verify our Istio installation we can enter this command:
kubectl get all -n istio-system
Another check to verify the Istio CRDs:
kubectl get crds | grep 'istio.io' | wc -l
      14
Install Prometheus, Grafana, Jaeger, Kiali
Istio changed the way to install add ons. These add ons must be installed separately:
Prometheus
https://istio.io/latest/docs/ops/integrations/prometheus/
kubectl apply -f https://raw.githubusercontent.com/istio/istio/release-1.27/samples/addons/prometheus.yaml
Grafana
https://istio.io/latest/docs/ops/integrations/grafana/
kubectl apply -f https://raw.githubusercontent.com/istio/istio/release-1.27/samples/addons/grafana.yaml
Jaeger
https://istio.io/latest/docs/ops/integrations/jaeger/
kubectl apply -f https://raw.githubusercontent.com/istio/istio/release-1.27/samples/addons/jaeger.yaml
Kiali
https://istio.io/latest/docs/ops/integrations/kiali/
kubectl apply -f https://raw.githubusercontent.com/istio/istio/release-1.27/samples/addons/kiali.yaml
Check Installation
So lets check what happened during Istio installation:
A new namespace istio-system was created:
kubectl get ns
NAME              STATUS   AGE
default           Active   126m
istio-system      Active   15m
kube-node-lease   Active   126m
kube-public       Active   126m
kube-system       Active   126m
and these pods where started in this namespace:
kubectl get pods -n istio-system
NAME                                   READY   STATUS    RESTARTS   AGE
grafana-784c89f4cf-zd5cb               1/1     Running   0          4m20s
istio-egressgateway-96cf6b468-chd6x    1/1     Running   0          5m9s
istio-ingressgateway-57b94d999-pqz8s   1/1     Running   0          5m9s
istiod-58c5fdd87b-m4np9                1/1     Running   0          5m13s
jaeger-7f78b6fb65-v8fx9                1/1     Running   0          4m12s
kiali-dc84967d9-lgqq7                  1/1     Running   0          3m8s
prometheus-7bfddb8dbf-l4z6p            2/2     Running   0          4m31s
Hint: since Istio 1.5 the control plane consists of only one pod named istiod
Install Shell-Completion for Kubernetes and Istio
Working with Kuberntes and Istio is mainly done with shell commands. To avoid typing errors you should install the appropriate shell-completions.
Kubernetes:
https://kubernetes.io/de/docs/tasks/tools/install-kubectl/#aktivieren-der-automatischen-autovervollständigung-der-shell
Istio:
https://istio.io/docs/ops/troubleshooting/istioctl/#istioctl-auto-completion
Pre-Pull Base Docker Images
Just in case the network at the workshop location is slow, please pull the following Docker images to get it into your local Docker cache:
docker pull michaelhofmann/smw-account:1.0.0
docker pull michaelhofmann/smw-order:1.0.0
docker pull michaelhofmann/smw-payment:1.0.0
We will use these images for our services.
Log Streaming with Stern
Everybody who wants a better experience with log streaming can use stern:
https://github.com/stern/stern
IDE, Maven and Gradle (Optional)
To change the Java code of the services in our exercises, everybody can use their preferred IDE. Building the services (war files) will be done with Maven Wrapper and Gradle Wrapper (both wrappers are part of the source projects).
All exercices in the workshop can be executed without changing the Java code of the services!